Security in Kubernetes using OWASP
Posted January 4, 2022 by Thomas Kooi ‐ 18 min read
Improve your security posture using OWASP for Kubernetes hardening.
Avisi Cloud has a rich history of operating Kubernetes clusters in production since early 2018. Over time, significant advancements have taken place. In this article, we will explore practical use cases for strengthening the security of a Kubernetes cluster. We will delve into these examples by leveraging the renowned OWASP Security by Design principles.
By the end of this post, we will also introduce helpful tools that aid in verifying the implementation of essential security policies.
Table of Content
Assumptions
- This page is based on Kubernetes 1.21.
Security Risks, threats & principles
To effectively secure a system, it is crucial to have a comprehensive understanding of the potential risks and threats involved. In the case of Kubernetes, Microsoft offers valuable assistance in this regard through their informative Kubernetes threat matrix.
This resource provides a detailed overview of the potential attack vectors and vulnerabilities that should be considered when implementing security measures for Kubernetes. By referring to the Kubernetes threat matrix, you can gain valuable insights into the security landscape and better prepare for safeguarding your Kubernetes environment.
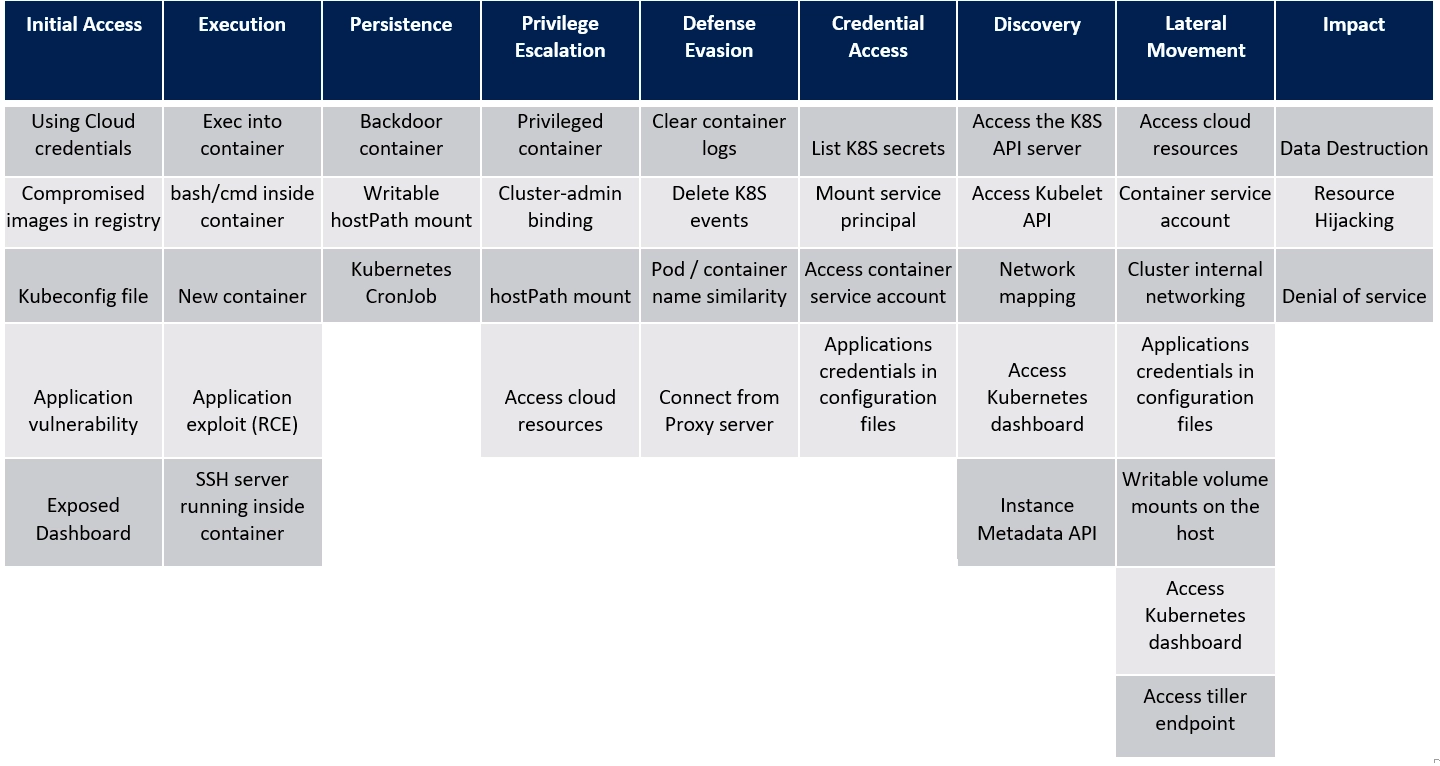
The Kubernetes threat matrix, built upon the widely recognized MITRE ATT&CK framework, provides a comprehensive breakdown of tactics that adversaries may employ. This invaluable resource outlines the following critical tactics to consider when assessing Kubernetes security:
- Initial access: Examining potential avenues for an attacker to gain initial entry into the system.
- Execution: Understanding techniques used by attackers to execute malicious actions within the Kubernetes environment.
- Persistence: Identifying methods utilized by adversaries to maintain unauthorized access over an extended period.
- Privilege escalation: Assessing potential approaches for adversaries to elevate their privileges within the Kubernetes infrastructure.
- Defense evasion: Exploring tactics employed by attackers to evade detection and bypass security measures.
- Credential access: Evaluating methods used by adversaries to obtain unauthorized access to sensitive credentials.
- Discovery: Understanding how attackers gather information about the Kubernetes environment to facilitate their malicious activities.
- Lateral movement: Examining techniques employed by attackers to move laterally within the Kubernetes cluster, expanding their reach.
- Impact: Assessing the potential consequences and damage that can result from successful attacks on the Kubernetes infrastructure.
To ensure the security of your Kubernetes cluster, it is essential to implement appropriate measures that address each of these tactics. Microsoft’s blog post serves as a valuable resource and an excellent starting point for understanding these tactics and formulating mitigation strategies. By leveraging the insights provided in the blog post, you can gain valuable guidance on securing your Kubernetes environment against potential threats and vulnerabilities.
Security by Design
Understanding the threat matrixs help you figure out what you are securing against. Making use of security principles, will help you figure out what kind of measures to implement.
To assist with this, you can make use of the OWASP Security by Design principles.
- Minimize attack surface area
- Establish secure defaults
- Principle of Least privilege
- Principle of Defense in depth
- Fail securely
- Don’t trust services
- Separation of duties
- Avoid security by obscurity
- Keep security simple
- Fix security issues correctly
Implementing security in Kubernetes
1. Minimize attack surface area
A good way to mimimize risk is by reducing the attack surface area. Within Kubernetes, there are a couple of ways to do this.
Minimal images
Run minimal images, preferably without a shell. A good suggestion for this are distroless images.
Additionally most distro’s have a minimal version available. Additionally, for some workloads you may switch to an alpine based image.
Running images such as distroless or a minimal distro, essentially come down to removing a lot of the unnecessary packages present. While unused files on it’s own are not always a problem, not having those do a couple of things;
- Speed up your deployments by reducing bandwith / storage usage.
- Should your application be comprised, there are a lot less potential convenient tooling available for a malicious user.
- When using vulnerability scanning, you won’t get as many false positives - as a result, you actually get a good idea of what you need to pay attention to.
Ingress traffic
Network traffic coming from the public internet should never directly arrive on the nodes within your cluster. Instead, utilize a load balancer infront to handle all incoming traffic.
- Make use of an ingress controller or gateway (proxy) to handle ingress traffic behind the load balancer.
- Configure network policies for your ingress controller and any other service serving ingress traffic (e.g node ports, load balancers)
A good network policy to install in each namespace is a default deny all policy:
kind: NetworkPolicy
apiVersion: networking.k8s.io/v1
metadata:
  name: default-deny-all
  namespace: examplenamespace
spec:
  podSelector: {}
  policyTypes:
    - Ingress
    - Egress
  ingress: []
  egress: []
Other examples of good network policies include, instead of allowing all egress traffic, being explicit about what a container may do. This is a policy to allow DNS traffic to the Kube-system namespace:
kind: NetworkPolicy
apiVersion: networking.k8s.io/v1
metadata:
  name: allow-util-traffic
  namespace: examplenamespace
spec:
  podSelector:
    matchLabels: {}
  policyTypes:
  - Egress
  egress:
  - ports:
    # Allow DNS
    - port: 53
      protocol: UDP
    - port: 53
      protocol: TCP
    to:
    - namespaceSelector:
        matchLabels:
          kubernetes.io/metadata.name: kube-system
And if your application requires access to the public internet, avoid allowing egress traffic to just 0.0.0.0/0, but include an except for any internal subnets (RFC1918):
apiVersion: networking.k8s.io/v1
kind: NetworkPolicy
metadata:
  name: allow-egress-to-external
  namespace: examplenamespace
spec:
  podSelector:
    matchLabels:
      app.kubernetes.io/name: example
  policyTypes:
  - Egress
  egress:
  - to:
    - ipBlock:
        cidr: 0.0.0.0/0
        except:
        # deny internal RFC1918 subnets
        - 10.0.0.0/8
        - 172.16.0.0/12
        - 192.168.0.0/16
Container registries
In Kubernetes, everything is run using container images. If a compromised image makes its way into your cluster, there’s a risk of running harmful software like crypto miners. There’s even a potential for attackers to gain remote shell access or download malicious scripts.
To guard against such risks, begin by only operating trusted images. This involves:
- Use images from recognized and verified sources. If you’re operating on a large scale, it might be preferable to use images solely from your own registries.
- Implement image vulnerability scanning on every image used in your cluster. You can achieve this through an admission webhook for any newly activated image in your cluster, or you can start with your own images, conducting image scanning in your Continuous Integration (CI) pipelines and/or registry.
For those managing their own self-hosted registry using Harbor, there are several options to consider. If you’re using hosted solutions, it’s advisable to consult your provider’s documentation for guidance.
Good tools to use here, are for example trivy.
2. Establish secure defaults
The Establish secure defaults principle states that the default should be secure. Additional privileges should require extra steps.
Use Pod Security Policy or Pod Security Standards
Kubernetes has a native security control to limit the scope of privileges a container has when running in the cluster. The now deprecated Pod Security Policy was the way to do this. Since Kubernetes 1.21, this has been deprecated in favour of the new Pod Security Standards (PSS).
For any new Cluster, you should adopt PSS. PSS includes three policies called Privileged, Baseline and Restricted.
| Profile | Description |
|---|---|
| Privileged | Unrestricted policy, providing the widest possible level of permissions. This policy allows for known privilege escalations. |
| Baseline | Minimally restrictive policy which prevents known privilege escalations. Allows the default (minimally specified) Pod configuration. |
| Restricted | Heavily restricted policy, following current Pod hardening best practices. |
When enabled in your cluster (through a featureGate), you can configure this on a per namespace basis. Since Kubernetes 1.26, this has been enabled by default.
apiVersion: v1
kind: Namespace
metadata:
  name: my-restricted-namespace
  labels:
    pod-security.kubernetes.io/enforce: restricted
    pod-security.kubernetes.io/enforce-version: latest
    pod-security.kubernetes.io/warn: restricted
    pod-security.kubernetes.io/warn-version: latest
Admission controllers
The Cloud Native ecosystem offers some excellent projects that can ensure your applications operate with the appropriate settings. These tools can offer a helping hand by providing secure defaults. For example, they can automatically set up PodSecurityContext or install NetworkPolicies within your cluster, boosting your system’s security without additional effort from your side.
Kyverno
Kyverno is a Kubernetes native policy management system. It’s very easy to get started with the project.
Using a project such as Kyverno, allows you to enforce any policy you wish within Kubernetes. A good set of default policies are also available as examples.
A prime example of secure defaults within a Kubernetes cluster is installing a default network policy that denies all traffic. This can be done with Kyverno through the following policy:
apiVersion: kyverno.io/v1
kind: ClusterPolicy
metadata:
  name: add-networkpolicy
  annotations:
    policies.kyverno.io/title: Add Network Policy
    policies.kyverno.io/category: Multi-Tenancy
    policies.kyverno.io/subject: NetworkPolicy
    policies.kyverno.io/description: >-
      By default, Kubernetes allows communications across all Pods within a cluster.
      The NetworkPolicy resource and a CNI plug-in that supports NetworkPolicy must be used to restrict
      communications. A default NetworkPolicy should be configured for each Namespace to
      default deny all ingress and egress traffic to the Pods in the Namespace. Application
      teams can then configure additional NetworkPolicy resources to allow desired traffic
      to application Pods from select sources. This policy will create a new NetworkPolicy resource
      named `default-deny` which will deny all traffic anytime a new Namespace is created.
spec:
  rules:
  - name: default-deny
    match:
      resources:
        kinds:
        - Namespace
    generate:
      kind: NetworkPolicy
      name: default-deny
      namespace: "{{request.object.metadata.name}}"
      synchronize: true
      data:
        spec:
          # select all pods in the namespace
          podSelector: {}
          # deny all traffic
          policyTypes:
          - Ingress
          - Egress
3. Principle of Least privilege
Do not run containers as root
Most standard workloads do not require to run under a root user. Even in a container, it’s not a good idea to use root, since this allows for a large degree of privileged actions in Linux. Potential risks could include obtaining access to a Kubernetes node (container escape).
When creating a new container image, make sure it does not run as a root user. You can do this by providing the USER statement in your Dockerfile. Sysdig has a good blog post on Dockerfile best practices.
A common reason images still do use root, is to allow for usage of a port below 1024. You should instead either use a higher port for your application, or use linux capabilities to allow usage of this port (CAP_NET_ADMIN).
Note that when doing the latter, you should make sure you add this capability in your container’s securityContext capabilities.
Use RBAC
RBAC is enabled by default within Kubernetes. However you should use it correctly. When creating a new Service Account, make sure you give it only the necessary permissions.
You should also either avoid mounting the default service account token within a pod (automountServiceAccountToken: false), or create a dedicated service account for a deployment and not give it any permissions.
- Dedicated Service Account for each deployment
- Avoid mounting the service account token unless necessary (e.g. with service meshes, or if access to the Kubernetes API neccessary)
- Avoid using the
cluster-adminclusterRoleBinding. Use dedicated RBAC roles for each service account and/or user. A project that may be able to assist with this is RBAC manager by FairwindsOps.
Protect Cloud Credentials
Cloud provider credentials are often highly privileged, as they provide access to infrastructure such as EC2 instances, your control plane VMs, or back-ups. Within a Kubernetes context, there are two places that may have cloud provider credentials:
- Cloud integrations, such as the a cloud controller manager. These are used to provision load balancers, perform auto-scaling or manage persistent volumes.
- Instance metadata, an API or document stored on the VM that allows you to access the cloud provider API.
Using the principle of least privilege, you should make sure that any credentials have the minimal necessary amount of permissions set. Should something go wrong, the impact may be limited.
Second, make sure that any namespace has properly configured network policies. This prevents access to the instance metadata api (169.254.169.254 on AWS, for example).
And make sure that any workloads using Kubernetes Secrets with these credentials are running on nodes separate from your normal application workloads. If an attacker manages to break out of a container and access the host system, they will not be able to few or query the Kubernetes Secrets on that node.
Kubeconfig file
The kubeconfig file is a way to communicate with apiserver. It holds the credentials and endpoint of the Kubernetes API. If an attacker gains access to a kubeconfig file, they can peform actions while impersonating the user or system from too which the kubeconfig belongs to.
Credentials used in a kubeconfig file should be able to be revoked easily. This means making use of an authentication mechanism such as OpenID Connect.
You should not use or share client certificate based kubeconfig files with users. You should definely not use the cluster-admin user with a client certificate. The reason being that there currently is no mechanism to revoke client certificates within Kubernetes (kubernetes/kubernetes#60917).
If OIDC is not available, consider using static bearer tokens, or use very short lived certificates.
4. Principle of Defense in depth
Defense in depth tells us to make sure that if one policy fails, there is an additional policy in place at a lower level that should prevent abuse.
API Server access
While applying the principle of least privilege with RBAC is a good measure, you should limit access to the API server.
- When running a cluster, make sure access to the Kubernetes API Server is secured through a firewall or IP restricted.
- Install network policies within each namespace, denying access to external services (including the Kubernetes API service). Explicity allow specific pods access to the API server, when necessary.
Pod Security Contexts
In principle of least privilege we talked about not running containers / pods as a root user. This should limit a lot of access. You should additionally also limit linux capabilities, and configure your pod security policy to specific run the container with a given user id.
Configure the pod security context:
    securityContext:
        runAsNonRoot: true
        runAsGroup: 65532
        runAsUser: 65532
        fsGroup: 65532
Configure the container security context by dropping all linux capabilities, and running with a readOnly root filesystem:
    securityContext:
        allowPrivilegeEscalation: false
        readOnlyRootFilesystem: true
        capabilities:
            drop: [ 'ALL' ]
Use seccomp
With seccomp you can restrict linux functionality that your container has access to. It limits the available syscalls.
While most of these are already unavailable when you configure proper pod and container security contexts, part of the defense in depth principle is to do this at multiple layers of the stack.
Seccomp can easily be configured for nearly all applications. This can be done in two ways:
Before Kubernetes v1.19 you have to use the following annotation:
seccomp.security.alpha.kubernetes.io/pod: runtime/default
Since Kubernetes 1.19 you can configure this as part of the pod’s securityContext:
  securityContext:
    seccompProfile:
      type: RuntimeDefault
5. Fail securely
Webhooks (admission controllers)
Policy management engines use admission webhooks to validate resources during admission to the Kubernetes API server. Make sure that when using a custom installed webhook for this purpose, you configre the validation webhook to deny the request if the service it needs to reach is unavailable.
This makes sure that you cannot admit resources that do not comply with policy by performing a DoS attack on the policy engine.
This can be done by configuring the failurePolicy for a webhook:
apiVersion: admissionregistration.k8s.io/v1
kind: MutatingWebhookConfiguration
...
webhooks:
- name: my-webhook.example.com
  failurePolicy: Fail
  ...
See also: documentation
6. Don’t trust services
Use mTLS for communication
Ensure that all components deployed within Kubernetes are configured to use mTLS. Using mTLS does a couple of things;
- It allows both the client and server to proof their identity.
- It allows for authentication before any communication happens.
It may also be desired to use mTLS between the workloads deployed within the cluster. This could be done manually, using cert-manager and self signed certificates, or through usage of a service mesh such as linkerd.
Both of these methods will allow for a zero trust security (never trust, always verify) deployment, due to the proven identity. Make sure to combine this with a strong identity and authentication solution at the application layer (such as OIDC).
Store events and logs externally
One tactice used in defense evasion is to delete Kubernetes events, or clear the container logs. Make sure you route events and container logs to an external service, with additional access controls, separate from Kubernetes.
Events
Kubernetes events should be stored externally. This could be achieved by folowing the event stream with a custom component within your cluster, and logging them to stdout, allowing a log collector to transport these to another system, or using something like an event router to directly forward the events.
Some projects for this are;
- opsgenie/kubernetes-event-exporter
- heptiolabs/eventrouter (outdated, though still usable)
Log collection
While kubectl logs is perfectly fine to watch logs in real time, you should be storing any log events from all systems running on the cluster in an external system. This can be ELK, Loki or any other logging system.
- Most Kubernetes providers have a default solution for log management (at least the large public cloud providers). This is an easy to get started with option.
- Alternatively, deploy your own ELK stack or Loki and install a logging daemon within your cluster to forward the events. Note that you should preferably not be installing these components within the same cluster.
7. Separation of duties
Traditionally the separation of duty principles often talk about using separate users for different domains. Within Kubernetes, this translates to using external users vs service accounts, and also the roles of nodes within a cluster.
Service Accounts and Users
- You should not use service accounts and their tokens for authenticating human users. Each user should use a personal account.
- You should not share service accounts between deployments / statefulsets.
- Service accounts should only be used by system components, plugins that require access to the Kubernetes API Server (ingress controllers, operators, …) or external services that integrate with Kubernetes (make sure to apply the least privilege principle).
Use separate node pools
Make sure you run separate node pools for privileges systems, such as databases, or secret management systems such as Vault. This also goes for running privileges components within your cluster, such as a cloud controller manager (should run on control plane nodes).
While you can limit a lot of access by using network policies and pod security contexts, should someone manage to break out of a container and obtain access to a node, they have access to any secret and/or process running on that node.
8. Avoid security by obscurity
The avoid security by obscurity principle tells us to make sure there are sufficient security controls in place that can be relied upon. Translated to Kubernetes, this means;
- Do not rely on a service not being discovered for security (e.g. some random namespace and ports in use)
- Make sure you do not rely on a random node port to restrict ingress traffic to your application. Put a network policy and some authoriation in place instead.
9. Keep security simple
Kubernetes itself, and the cloud native eco-system can be a complex system. When you deploy a cluster, you should be able to understand it’s security posture. The principle of “keep Security simple” tells us to make sure you avoid adding a lot of complexity for humans when adding in security controls.
Make sure that you use the automation options available within Kubernetes to get started with security. Using an admission controller (Kyverno) to mutate any deployments created to adhere to a default security posture, or tooling to assist developers with security is a must.
This avoids introducing new risk caused by human errors.
Visibility
You can keep security simple, by ensuring you have great visibility into the controls in place, and how they are applied in production. Most Policy management tools (such as Kyverno) come with a UI that can be used for this purpose.
10. Fix security issues correctly
Application vulnerability
Having a vulnerability within your application could lead to access to resources within your cluster. Examples of this are; starting a new shell, accessing data from another internal endpoint (SSRF).
The following tactics defend against this;
- Configure network policies. This limits exposure should an attacker manage to gain a foothold within an application
- Run minimal images, preferably without a shell. A good suggestion for this are distroless images.
When an application vulnerability has been identified, make sure it’s risk is minimized through the above items, and make sure you can patch it quickly. For this, you need an automated deployment pipeline.
Patching CVE’s
Use a vulnerability scanner to identity CVE’s within your container images. Once identified, patch them to a new version. Use the vulnerability scanner to make sure the CVE’s are no longer present within your container image.
Idealy this proces happens within your CI pipelines, with additional scanning happing within your clusters.
Tooling
Deploying Kubernetes can be challenge. Making sure your security posture is good, even more so. Luckily there are plenty of tools and products available to help you with the process.
Some of our favourite tooling to use to aid with this are:
- Kube hunter- Kubernetes security weakness hunter
- Kube bench - CIS Kubernetes Benchmark validation
- Polaris - Kubernetes Best practices scanner
- Clusterlint - A best practices checker for Kubernetes clusters.